
Page 155 - Lion - Trade 56
P. 155
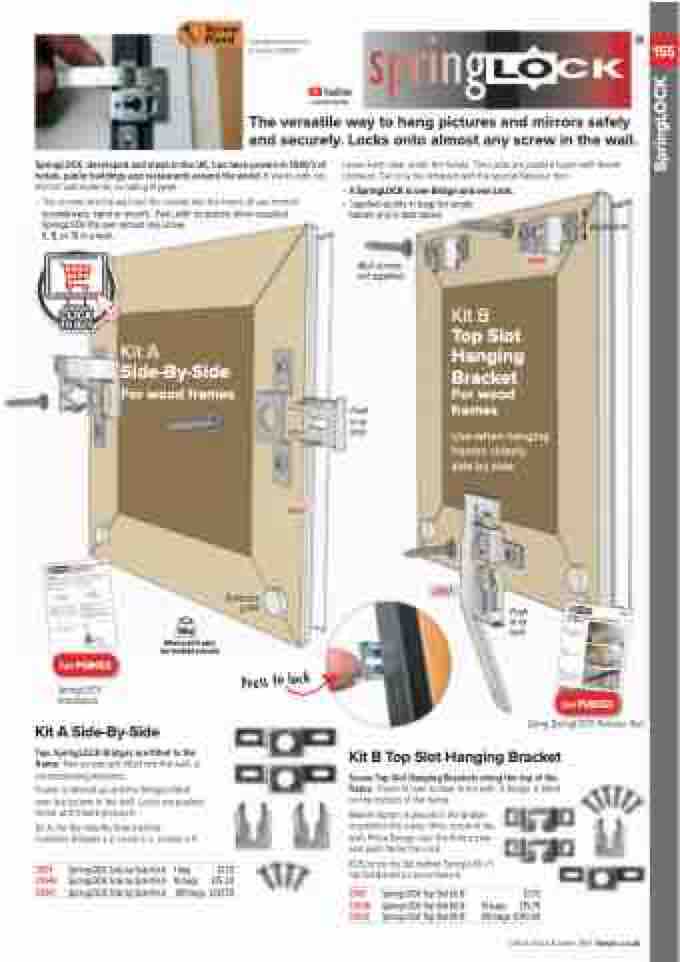
SpringLOCK, developed and made in the UK, has been proven in 1000’s of hotels, public buildings and restaurants around the world. It works with any kind of wall material, including drywall.
• The screws into the wall and the screws into the frame all use normal screwdrivers, hand or electric. Fast, with no special driver required. SpringLOCK fits over almost any screw,
6, 8, or 10 in a wall.
Leave 3mm clear under the heads. The Locks are pushed home with thumb pressure. Can only be removed with the special Release Tool.
Kit A
Top Slot
Side-By-Side For wood frames
Hanging
® and securely. Locks onto almost any screw in the wall.
  Copyright and protected by patent P.2289217
4647
LIONPFSLTD
The versatile way to hang pictures and mirrors safely
• A SpringLOCK is one Bridge and one Lock. • Supplied as kits in bags for single
frames and in bulk packs.
Wall screws not supplied
Push in to lock
Adjustable
 Kit B
Bracket For wood frames
Use when hanging frames closely side by side
4648
     Bumpers p.144
2957
         20kg
Push in to lock
  When used in pairs and installed correctly
Kit A Side-By-Side
Two SpringLOCK Bridges are fitted to the frame. Two screws are fitted into the wall, in corresponding positions.
Frame is offered up and the Bridges fitted over the screws in the wall. Locks are pushed home with thumb pressure.
Kit A, for the Side-By-Side method. Contains: Bridges x 2, Locks x 2, screws x 4.
  See PUB052 SpringLOCK
     Installation
See PUB053
Using SpringLOCK Release Tool
   2954 2954B 2954C
SpringLOCK Side by Side Kit A SpringLOCK Side by Side Kit A SpringLOCK Side by Side Kit A
1 bag 10 bags
100 bags
£1.70 £15.30 £137.70
Kit B Top Slot Hanging Bracket
Screw Top Slot Hanging Brackets along the top of the frame. These fit over screws in the wall. A Bridge is fitted on the bottom of the frame.
Marker Button is placed in the Bridge to position the lower, third, screw in the wall. Place Bridge over the third screw and push home the Lock.
Kit B, for the Top Slot method: SpringLOCK x 1, Top Slot Bracket x 2 and screws x 6.
Screw Fixed
          3943 3943B 3943C
SpringLOCK Top Slot Kit B SpringLOCK Top Slot Kit B SpringLOCKTopSlotKitB
£1.75 £15.75 100bags £140.00
  10 bags
 Check stock & order 24/7: lionpic.co.uk
 155
 SpringLOCK
 Method A - ‘Side-by-Side’
Method B - ‘Hang Plate’
<Xmm >
Brid+ge Spri4n6g4L7OCK
<Ymm> Hang Plates 4648 View from back of frame
Lock Viewofffrroambeack
Mark position of the two screws on wall, ‘X mm’ distance apart. Use masking tape to avoid marking wall. Always use a spirit level. Bridges have slots for fine adjustment.
Drill and fit screws into wall. Use No.6, No.8 or No.10, as available, and wall plug or dry wall anchor as required. Leave screw heads proud by 1⁄4” / 5mm app.
Screw two Hang Plates and Bridge to frame as shown. Measure distance apart, ‘Y mm’.
Fit two No.6, No.8 or No.10 screws in wall ‘Y mm’ distance apart.
< Xmm >
Put Marker Button in the Bridge. Hang frame on wall, engaging Hang Plates on to screws. Press on bottom to mark position of third screw.
Lift off frame and remove Marker Button. Insert third screw in wall. Or, use Release Tool with Marker, 7165. Replace frame on wall and push in Lock to secure.
Insert two screws in wall for Side-by-Side method.
Offer frame up to wall, fitting Bridges over screws in wall and push in Locks with fingers.
Iinsweartllthforer eHascnrgews < Y mm > PthMliaradterksmcpreotwshiotwidoi.nthfor
Marker Button.
PLuoschkisncLaonckosntlyobsecruermeovedrswcirthewspseinciwalaRlle.leaseTool,7165or2957.
Release Tool - the Locks in SpringLOCK are pushed itnoowl,it2h9fi5n7goer 7p1r6e5ss. ure. To release them use a special
The versatile way to
hang pictures and mirrors safely and securely. Locks onto almost any screw in the wall.
PUB 052
Installation
The SpringLOCK system consists of a Bridge and a Lock. It is typically installed on the back of a frame either in pairs (Side-by-Side method) or, at the bottom of a frame, with Hang Plates at the top (Hang Plate method). They lock on to screws in the wall. The picture can only be released using the special tool.
First, screw the SpringLOCK hardware to the back of the frame, as the drawings. Part insert Lock into Bridges. Measure distance ‘X mm’ between hardware to give spacing for screws in wall.
V.3 12/2016
Marker Button
5693
Press to lock
Using the Springlock Release Tool and Marker
1
Offer the Marker, 7165, point up, to the SpringLock hole of the bracket. The lock insert should be partially withdrawn.
2
Place the Marker into the hole of the SpringLock bracket.
3
With the Marker Tool in position in the SpringLock, position frame on wall. Gently tap against the frame at the marker position to indicate the exact screw location on the wall.
See Lion Trade catalogue or
wfowr fwu.llioinfpoico.ncot.huek SpringLock anti-theft fixing for wood frames
LION Picture Framing Supplies Ltd
lionpic.co.uk
1T4e8l: 0G1a2r1ri7s7o3n 1S2tr3e0et, Binirfmo@inlgiohnapmic.Bc9o.4ukBN Open 08.45 - 17.00 Monday to Friday
Any prices quoted are correct as at April 2016. Please check before ordering.
PUB 053
V.2 03/2016
