
Page 78 - Lion - Trade 56
P. 78
78
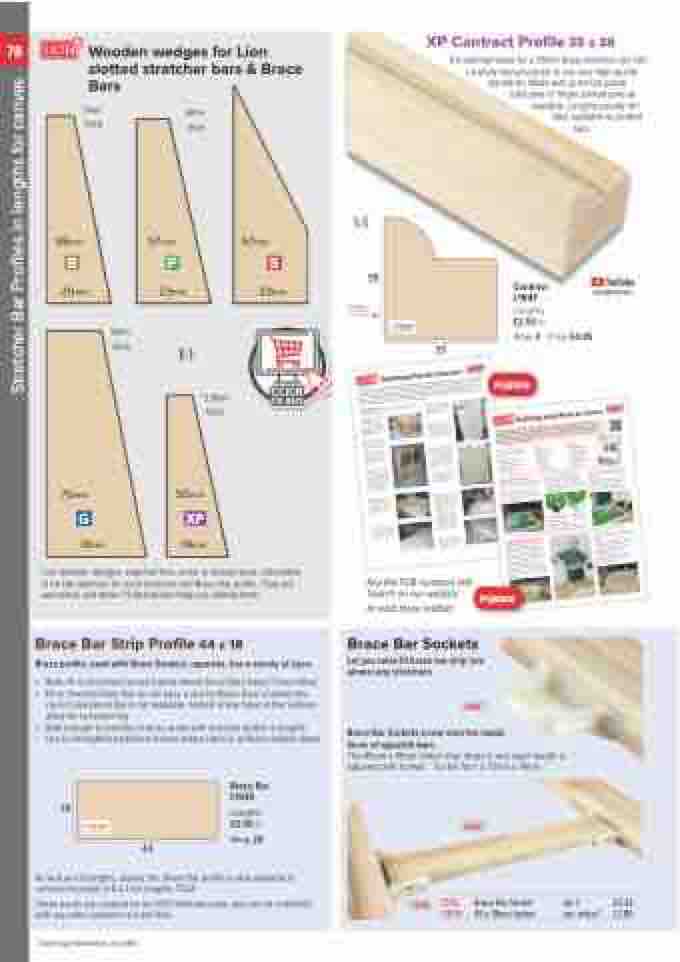
Wooden wedges for Lion slotted stretcher bars & Brace Bars
3mm thick
58mm 58mm
4mm thick
20mm 20mm
23mm 23mm
1:1
5.8mm thick
23mm 23mm
70mm 70mm
50mm 50mm
6mm thick
57mm 57mm
67mm 67mm
BPS
G XP
31mm 19mm
31mm 19mm
Lion wooden wedges, supplied free, come in several sizes, calculated to be the optimum for each stretcher and Brace Bar profile. They are unmarked, and these 1:1 illustrations help you identify them.
PUB005
PUB004
Brace Bar Strip Profile 44 x 18
Brace profile, used with Brace Sockets, opposite, has a variety of uses:
• Retro-fit to stretched canvas frames where Brace Bars haven’t been fitted
• Fit to Stretcher Bars that do not have a slot for Brace Bars or where the
correct size Brace Bar is not available. Slotted screw holes in the Sockets
allow for re-tensioning
• Add strength to stretcher frames made with stretcher profile in lengths
• Use to strengthen traditional frames where there is sufficient rebate depth
18
L1939
44
Brace Bar L1939
Lengths
£2.00 m Wrap 24
As well as full lengths, usually 3m, Brace Bar profile is also available in convenient packs of 8 x 1.5m lengths, 7524.
These packs are covered by our £50 minimum order and can be combined with any other products to meet that.
Brace Bar Sockets
Let you retro-fit brace bar strip into almost any stretchers
7235
Brace Bar Sockets screw onto the inside
faces of opposite bars.
The 45mm x 18mm timber strip drops in and exact length is
adjusted with screws.
7235
Socket face is 72mm x 19mm
7235 L1939
L
L
9
1
1
9
9
3
3
9
Brace Bar Socket 45 x 18mm timber
pk 2
per meter*
£2.33 £1.80
1:1
38
Chop
L1947
35
Key the PUB numbers into Search on our website
to read these leaflets.
Contract
L1947
Lengths
£2.50 m
Wrap8 Chop£4.85
XP Contract Profile 35 x 38
Exceptional value for a 38mm deep stretcher, yet still carefully manufactured to our very high quality
standards. Made with premium grade solid pine or finger jointed pine as
available. Lengths usually 3m. Also available as slotted
bars.
LIONPFSLTD
Ordering information on p.193
as well. Make up a stretcher frame by fitting together the slotted ends of the four stretcher bars.
6. With a tight grip on the pliers, pull firmly until a straight crease is formed running
from the pliers to the stapled end. Staple while maintaining plier tension at the top of the crease.
Stretching Inkjet Prints on Canvas
PUB 004
Check the squareness of the frame by measuring from corner to corner diagonally, so that both measurements are equal.
B
These instructions are for stretching inkjet prints on canvas that can be easily reproduced - not originals, limited editions or paintings with financial or sentimental value. Browse our website and read our current trade catalogue for details of our wide range of specialist materials, accessories, equipment and tools that will speed up and give consistency to the task. For a demonstration, come and see us in Birmingham.
Use a table top corner as a guide, and a rubber mallet.
If bracing is desired for a larger size, attach the brace/s in the brace slots, for later tensioning.
7. Move to a side and follow the same procedure, pulling firmly and stapling canvas to the stretcher at the centre, create first a triangle crease and then a diamond crease in the canvas with the fourth staple, at the opposite long side.
F
2. Alternatively, you can buy some stretcher bar profiles in long lengths. You cut and join these as you would any frame moulding. This can be very convenient for unusual sizes. The only drawback is that you cannot use wedges later for re-tensioning the canvas.
•
3. Spread the canvas on a clean flat surface, face down. There should be 75 - 100mm / 3” - 4” excess all round
C
8. Work out from the centre of the long sides. Move the pliers about 50mm / 2” to one side, pull tightly, and staple. Repeat in both directions from the centre, then move
Make sure the canvas is large enough to be stretched around the back of the stretcher bars.
You will need to allow at least 75mm of canvas all around the back of the frame to allow you to stretch and staple it to the back of the stretcher bars.
for gripping and stretching, depending on the type of stretchers.
to the opposite long side and continue.
On smaller canvases, an entire side can be stapled
4. To start, fold one side of the canvas over a short end of the stretcher, align with the image or the weave and staple at the centre of the stretcher bar.
the canvas should be rotated D several times, stapling
H
Stretching Fine Art Canvases PUB 005
Paintings or prints on canvas are traditionally framed after being stretched. Gallery Wrap is a style of stretching canvases onto deep sided stretchers, with the artwork continuing over the edge of the stretcher, remaining visible on the sides. The canvas is stapled on the back and neatly finished on the sides and corners, so that framing is not necessary. Framed or not, the canvas surface is left uncovered so that light falls directly on the image, undistorted by the reflective qualities of plastic or glass. Delicate printed images can be protected with heatseal film before stretching or varnished
after stretching. See print lacquers in current Lion trade catalogue.
Gallery Wrap Style - canvas taken right round stretcher and stapled on the back
5. Swap to the opposite side, using canvas pliers to grip the canvas in the left hand and hrioglhdtinhganthde. staple gun in the
E
1. Select appropriate sizes of stretcher bars.
Remember to allow for the canvas covering the sides
A
A linen primed canvas or printed canvas will normally require more closely spaced staples as there is limited stretch to the fabric.
• Safety knife
at one time. On larger ones,
individual sections in turn, moving out to the corners.
Gallery Wrap style
Traditional style
9. For a neat finish on the back of canvas wrap, neatly fold over the surplus canvas and secure with a second row of staples.
Inkjet prints on canvas are best protected by a laminate or coating.
This helps protect the ink from scratches and cracking on the edges. Some also
V.3 10/2015
G
There are four basic stages to stretching an inkjet printed canvas:
- Preparing the canvas
- Assembling stretcher bars
- Stretching the canvas
- Finishing the job
Tools Materials
professionally
• • Screwdriver • • Alignment gauge •
A Preparing the canvas
Whether the printed image is wrapped around the edges of the stretcher bars, Gallery Wrap style, or has white borders around the edges, Traditional Style, depends on the composition of the printed image and the customers preference.
add an element of UV protection and can enhance the image with a matt, satin or gloss effect.
Depending on the equipment you have available and the type of work you do the laminate protection can be a hot over- laminate, applied with a heated press.
B Assembling stretcher bars
Slot the bars together loosely by hand and use a soft faced hammer to knock them fully together.
Check the frame is square by measuring
Stretcher bars have special jointed corners that allow them to be slotted together. Wooden wedges are supplied with Lion stretcher bars. Over time, if the canvas sags, the wedges can be tapped further into the joints, opening them slightly and re-tensioning the canvas.
the distance between opposite corners. If you are assembling stretcher bars on a regular basis a 90° angle jig on your workbench will save time.
Stretcher bars are supplied in pairs. For a frame that is 406mm x 508mm / 16” x 20” you would order one pair of 406mm and one pair of 508mm bars. See current Lion Trade catalogue.
On larger frames, single or cross braces can be used with Premium or Gallery stretcher bar profiles.
• Soft faced hammer • Measuring tape
• Stretcher pliers
• Staple gun
•
Canvas protection
- Liquid coatings
- Hot mount laminate Stretcher Bars Self-adh brown tape CWH hangers
Felt bumpers
V.3 10/2015
Stretcher Bar Profiles in lengths for canvas
LMaterialis & Eoquipment for Pictu5re Framin1g and Wall Decor Professionals
AFCllEpAriBcTesRAeUxLcluAOdeRGVYAUT E205151 www.lionpic.co.uk
